
Learn Violin Online with Online Violin Teacher Meghan Faw Lesson 12/15: New Finger Placements
In today’s lesson, you’ll learn 4 new finger placements which will increase the number of notes and therefore the number of pieces that you can play.
The first finger placement we’ll be learning about is the low 2nd finger. If you’ll recall, when we initially learned the 2nd finger, I mentioned that was the high 2nd finger placement (close to third finger). The low 2nd finger placement is close to the first finger.

Low 2nd finger on E string, G natural

Low 2nd finger on A string, C natural
Low 2nd finger on D string, F natural

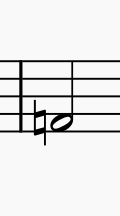
Low 2nd finger on G string, B flat
The second new finger placement we’ll learn about is the high 3rd finger. “High” finger placements indicate moving the finger closer to the bridge, and “low” finger placements indicate moving the finger closer to the scroll. The high third finger should be placed one half step closer to the bridge than the normal third finger. If you’re using finger tapes, the high third finger will be placed in between the third and fourth finger tapes.

High 3rd finger on E string, A sharp

High 3rd finger on A string, D sharp

High 3rd finger on D string, G sharp

High 3rd finger on G string, C sharp
The third new finger placement we’ll learn about is the low 4th finger. The low fourth finger is placed in the exact same position as the high 3rd finger. The low 4 will be placed right next to the regular third finger. If you’re using tapes, it will be placed in between the third and fourth finger tapes.

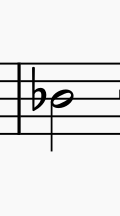
Low 4th finger on E string, B flat

Low 4th finger on A string, E flat

Low 4th finger on D string, A flat

Low 4th finger on G string, D flat
The high third finger and low 4th finger both utilize enharmonic tones. Enharmonic tones are notes that are the same pitch but can be spelled differently, meaning they can look different on sheet music.
If the low 4th finger and high 3rd finger essentially play the same notes, how do you know which one to use? A good rule of thumb is for sharp notes use the 3rd finger and for flat notes use the 4th finger. However, ultimately it does come down to personal preference.
The final finger placement we’ll be learning about is the low 1st finger. The low 1st finger is placed closer to the scroll, very close to the nut of the violin. When using the low 1st finger, be mindful not to cave the wrist in or move the hand back. Instead, use the base knuckle of the finger to pull it back.

Low 1st finger on E string, F natural
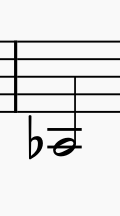
Low 1st finger on A string, B flat

Low 1st finger on D string, E flat
Low 1st finger on G string, A flat